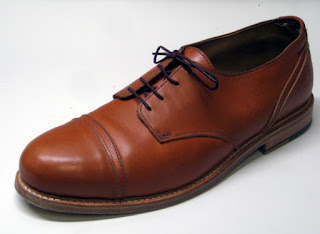
My Making schedule is based on the calendar; Sandals in the Spring, Derbys in the Fall.
The choice to go with suede was a risky one but it came out OK.
The development of the design went thru several stages but the theme of overlap has been maintained.
In 2006 I decided to shift my primary craft focus to the Art of Making Shoes. Shoes are hard to make. This is where I am so far. I like to call myself a "Self Directed Apprentice" I also make custom tools for Shoe and Boot Making
Saturday, December 30, 2017
Thursday, November 2, 2017
2017 Derby Development
After two design tryouts I have a finished development pair
I really began to like the "shadow" or "peek out" of the heel cap and the toe cap so that is the theme for these
My 1st fully stitched Landis 12 L pair; Great Machine!
I have a full 1/4" Poron inside too
The goal is to make a fully hemmed version next
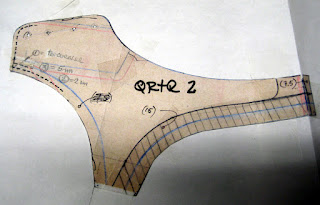
Its the patterns that get a little tricky
Instead of having little strips of patterns I'll cut windows and include the peek-outs with the adjacent pattern
As I go thru the development I make changes; add or subtract from the original unless it is a full on theme change the Master and the drape are still related
Friday, September 22, 2017
2017 Men's Sandal Development (3/8" padded footbed)
I really wanted to get to a buckle on the 2016 sandal.
A complete re-work of the basic theme
I am getting the lasting down by leaving the lining complete even in the area of the buckle so that the buckle is not taking the lasting loads
So with this method I can have any parts floating in any way and still have the lasted look
This time I wanted to us my super soft 1/4"Poron so on top of that goes 1/8" of a stiffer Poron blue
This makes it possible for me to wrap the foot bed by hand and get a crisp edge'
Sunday, September 10, 2017
DIY Leather Burnishing Wheel - Motor
Been working on refining the wheel part of my burnisher for a year or so and have it pretty good.
Just a 1/4hp motor will do the job
I made this collet for the end of the motor but you might be able to buy a collet too
The shortest length from the motor to the wheel is best
I used Bass wood but pine is OK, I use bee's wax and have nice results
The trick is that you have to have access to a wood or metal lathe, this is 2" in dia. and about 2" long
Over time I modified the grooves to suit my needs and I feel free to change them at will because there is very little cost involved.
Making:
The most important thing is to mount the wood to the shaft securely and then use that shaft to turn the wood on the lathe.
This is the best (only) way to make sure that the turned wood is super concentric with the shaft it is mounted to. If you turn the wood 1st then center drill it you will still see wobbling.
I really don't like using wheels that are not concentric because it bounces the work around and it also only uses one area of the wheel.
The most important thing is to mount the wood to the shaft securely
I can provide drawings if needed.
10.10.17
I have refined the drum process:
See bench-top set-up
Just a 1/4hp motor will do the job
I made this collet for the end of the motor but you might be able to buy a collet too
The shortest length from the motor to the wheel is best
I used Bass wood but pine is OK, I use bee's wax and have nice results
The trick is that you have to have access to a wood or metal lathe, this is 2" in dia. and about 2" long
Over time I modified the grooves to suit my needs and I feel free to change them at will because there is very little cost involved.
Making:
The most important thing is to mount the wood to the shaft securely and then use that shaft to turn the wood on the lathe.
This is the best (only) way to make sure that the turned wood is super concentric with the shaft it is mounted to. If you turn the wood 1st then center drill it you will still see wobbling.
I really don't like using wheels that are not concentric because it bounces the work around and it also only uses one area of the wheel.
The most important thing is to mount the wood to the shaft securely
I can provide drawings if needed.
10.10.17
I have refined the drum process:
- I take a piece of Bass wood and drill a 3/4 hole
- Slide in place a 3/4 x 1/8" wall tube
- Drill and tap a 1/4-20 set screw
- Mount this to the lathe
See bench-top set-up
Thursday, June 8, 2017
CB801 CowBoy Leather Skiver
So I decided that the number one machine that would help me get thru project development faster had to be a bell knife skiver.
The CB801 is a Chinese version of apparently the only design on earth that anyone ever developed for skiving.
It has a nice sound to it and 1st runs are very promising.
These machines are not for the "UN-mechanically" inclined; you will have a learning curve if you have never used one.
It is a technical machine that requires practice, practice, practice.
Adjusting the presser foot has two dimensions
Adjusting the drive wheel has two or three
Adusting the the bell knife has one
Grinding the bell knife is a challenge
Sunday, March 26, 2017
Deck Shoe with Side Sole Stitch
So I need something for spring especially something to wear to the CCS Student Show.
I had this cross-over idea for some time and as we all know if an idea won't leave you alone you must act upon it!
The basic idea is that the derby vamp line goes rearward of the normal point, and the heel cap goes forward of its conventional point; thereby crossing over.
As a summer shoe I saw the opportunity to open up the crossover and so had to set up the stitch lines carefully. The original, original idea was to do a woven leather vamp but I still don't know how to do that.
The lining does not have the hole in it
Skived and ready to assemble
Back half assembly
Closed Upper
Lasted
I am likely going to make my own cup-sole
The opening in the side was well received however, it made some awful wrinkles.
I went ahead without it.
Went with a hand made cup-sole
My 1st use of the side wall stitcher
Sunday, February 26, 2017
2017 Derbys
I have the last tuned in to where I like the fit and the "Chamfer" toe
Still not sure whats wrong with the extended side facing?
Wednesday, February 15, 2017
Marika comes to CCS in the D
This week in the FAD department at CCS we had the pleasure of an intensive one-day with Marika Verploegh from Brooklyn NY.
Marika presented several things:
The students got to try out the canvass wrap on a h-heel boot last and spend some time finishing.
Marika is a Master Bespoke Maker and teaches at RISD and FIT.
She was very kind to spend the day with me in my shop talking and reviewing shoes and shoe making tools of which I now make and sell about 10 different products.
- A "down and dirty" canvass last wrapping method
- A shrink wrap material for protecting your uppers during out-sole work
- And edge finishing of a stack heel.
The students got to try out the canvass wrap on a h-heel boot last and spend some time finishing.
Marika is a Master Bespoke Maker and teaches at RISD and FIT.
She was very kind to spend the day with me in my shop talking and reviewing shoes and shoe making tools of which I now make and sell about 10 different products.
Wednesday, January 25, 2017
2017 Boot Making Class at CCS
Cynthia Montague is teaching us one of the leather boots that she and Tim make in Flint Mi. at Sutorial. The class is being taught at CCS on Saturdays and spans 10 sessions.
We did the foot measure, size selection, clicking, and closing.
With that we went to the cutting table and made a full set of lining and outer parts.
With that finished I did the closing
More to come...
Subscribe to:
Comments (Atom)


